How to Bulk Export Office 365 Mailbox to PST? Step By Step Solution


The advanced features of Office 365 makes it different and high valued services from the others. Due to several reasons many organizations & users are searching for methods to create a copy of their Office 365 mailboxes and they want to export Office 365 mailbox to PST.
Therefore, this article is going to more focus on the topic of how to bulk save Office 365 emails to PST file format. Here you will know detailed information with the step-by-step procedure of various methods for the same operation. It also includes both manual as well as most secure 2nd alternative solutions. Which will help you to perform the bulk exporting process.
Let’s begin with automated solutions.
Manual Solutions to Save Office 365 Mailbox to PST File
In the coming section, we are going to discuss two manual methods which can help you to bulk export Office 365 mailbox data to PST file format. For users who are looking for a free manual solution, this might help them to execute the task. However, there are various limitations associated with the manual method, which we are going to discuss in the coming sections. Without any further ado, let’s get into it.
Must Read: Does Office 365 Keep Deleted Emails? Complete Guide
Method 1. Use eDiscovery to Bulk Export Office 365 Mailbox to PST
You will require permission for using the in-place eDiscovery mechanism to export Office 365 data to PST in BULK. Only an eDiscovery administrator can operate this tool.
So we are going to guide you through the complete process of setting up and using this manual mechanism.
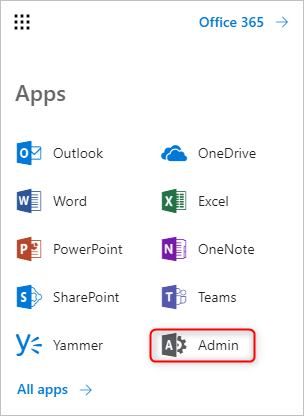
Step 1. Log in to your Office 365 account and click on Admin. It will open Admin Center.
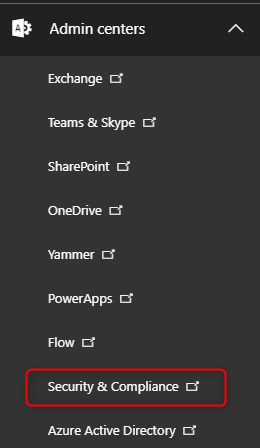
Step 2. Here, click on Admin Centers and select Security & Compliance.
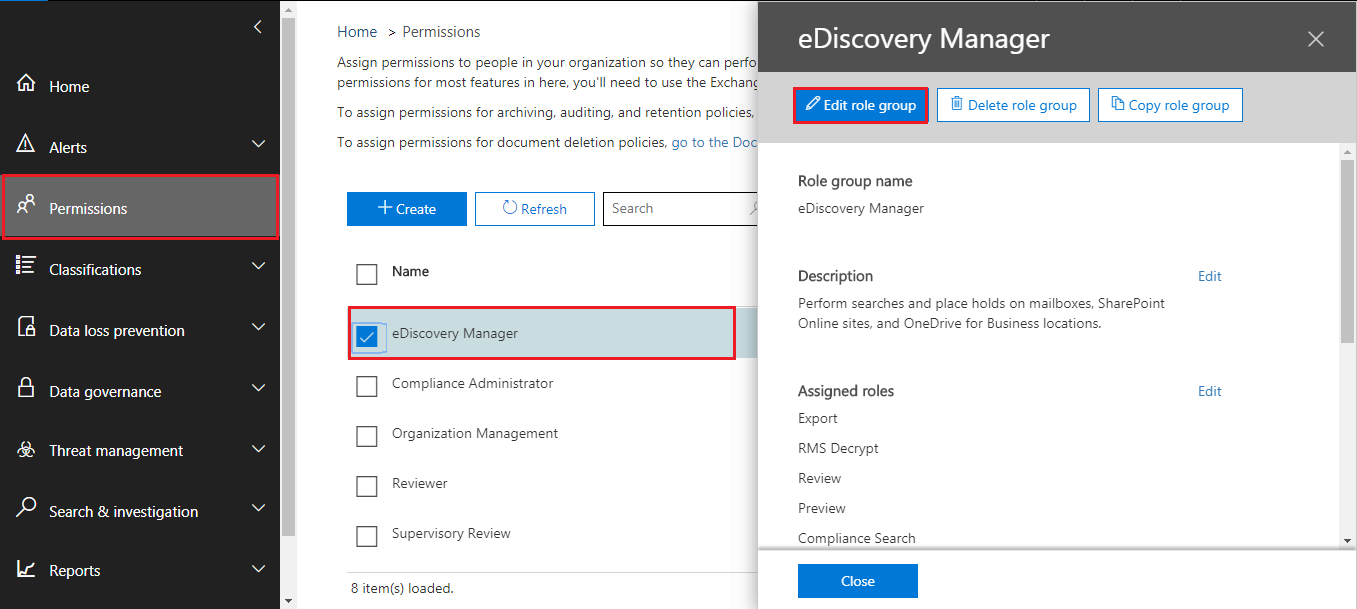
Step 3. Now, go to Permissions and check the eDiscovery Manager option. Make sure that the role of Export is assigned. If not then click on Edit to assign it accordingly.
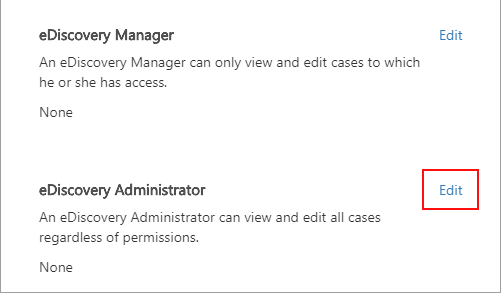
Step 4. Now click on Edit corresponding to eDiscovery Administrator and then continue to add a new user in the follow-up window
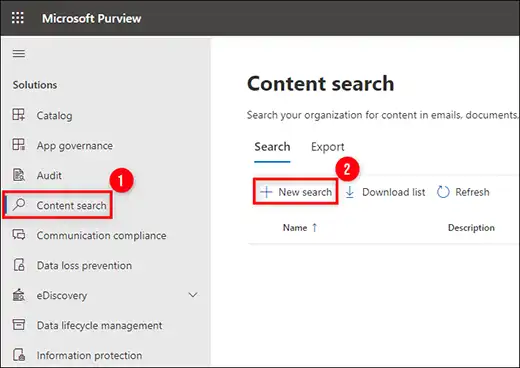
Step 5. Scroll down and navigate to the More Resources button. It will open the resource menu then navigate to Microsoft Purview Compliance Portal. Once done, move to >> Content Search. Here, click on the + New search button to open the content search wizard.
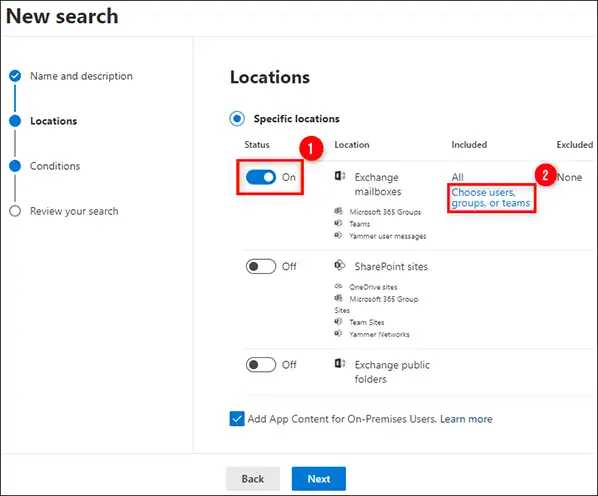
Step 6. This wizard lets you apply filters and customize all elements of content search options including – locations, conditions, etc. You can assign a name and description to this search and specify the search’s location.
- Exchange Mailboxes – This will scan and export the user mailboxes within the Exchange Online location.
- SharePoint Sites – Enable this option to scan and export the Sharepoint database.
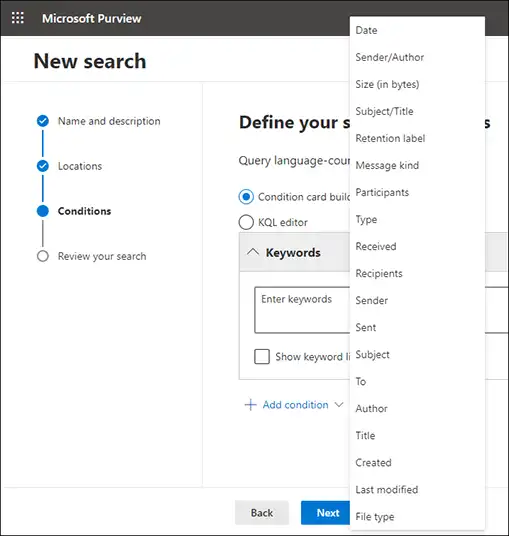
Step 7. Now in the Condition tab, you can apply various filters associated with this export process such as location filter (all or specific), conditions(date, sender, size, etc), and keywords(AND, OR, etc). Once all the required filters and settings are applied then you can click on the Submit and Done to close the wizard.
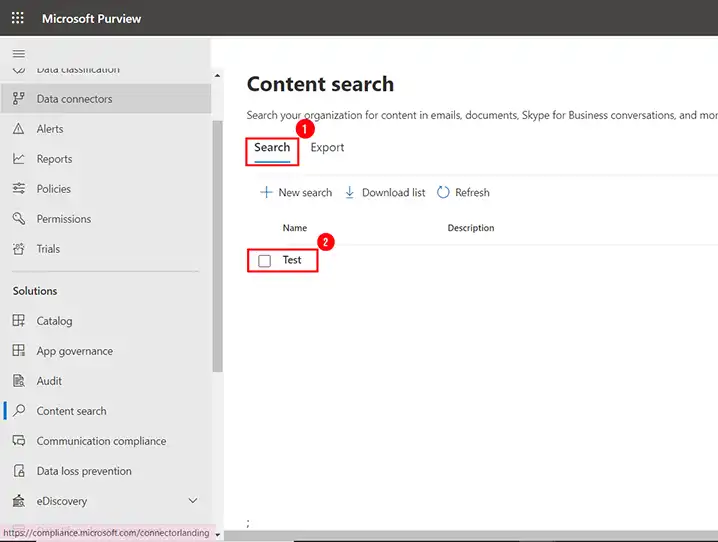
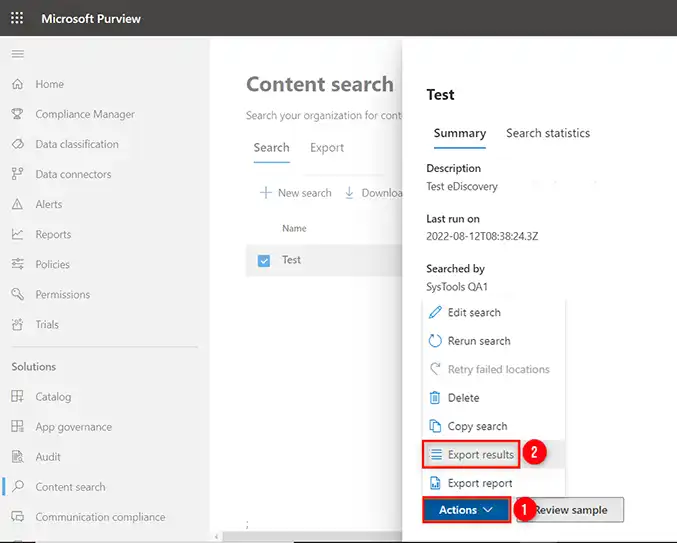
Step 8. Go back to the Content Search screen and click on the Search Name to track the status of the search.
Step 9. Here you can see the search details and the status of the search. If the search gets completed then you can click on the Actions and then click on Export Results.
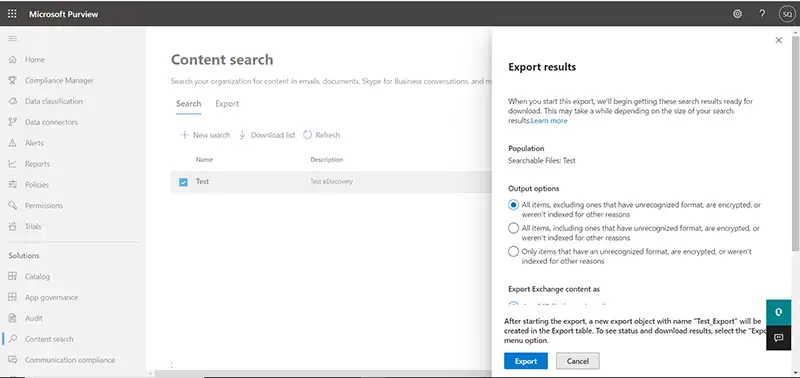
Step 10. From this window, you can choose from the list of export options as per your requirements and click on the Export button.
Step 11. It will start the export process instantly, Now you can choose for the export process to complete first or directly click on Download results. If desired, both the export and download process will complete at the same time.
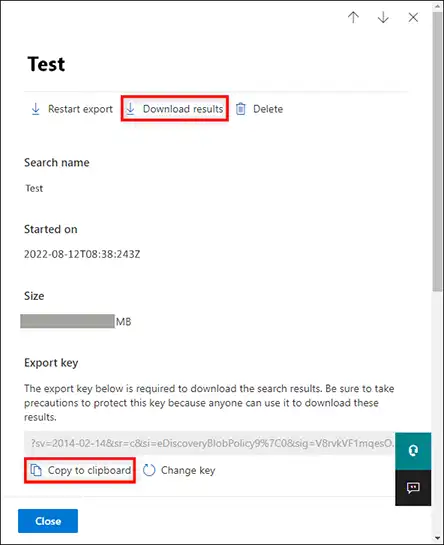
Step 12. Now, click on the copy to clipboard option to copy the special export key that you will find after the export gets completed. Then click on the download results button.
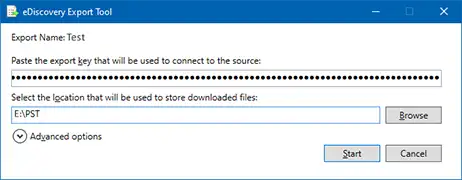
Step 13. The eDiscovery PST export tool will start running. Here, paste the copied key, choose the destination location, and click Start to save Office 365 emails as Outlook PST finally.
Limitations:
- The process is too lengthy and time-consuming. Furthermore, the steps are complex and confusing to implement.
- eDiscovery has a problem of getting hanged quite often during the process.
- Users need to have relevant technical knowledge in order to perform this method.
- Saving all mailbox items such as calendars, tasks, etc is not supported by this tool.
- Users with admin privileges can only perform the process.
- It is a complicated process & required proper technical knowledge to perform this operation.
Method 2. Save Office 365 Mailbox Using Outlook Desktop Application
This manual method is easier for non-technical users compared to other solutions. To save Office 365 mailbox to PST using the account configuration method user must have an Outlook desktop application on their system. Follow the below steps to understand the exporting process.
Step 1. Configure Office 365 account in Outlook desktop application with POP configuration.
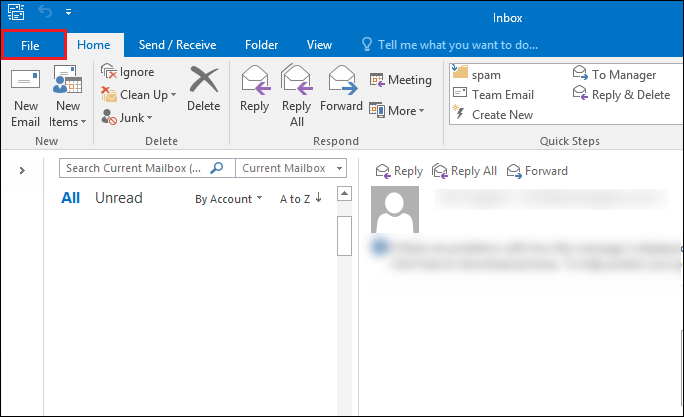
Step 2. Go to the File section from the top menu bar.
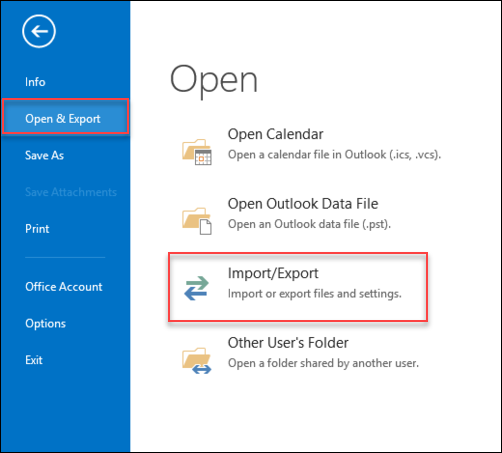
Step 3. Select the Import / Export option from the Open & Export section from the left panel of the opened window.
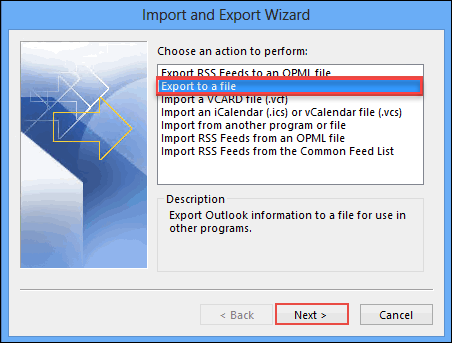
Step 4. From the Import and Export wizard choose the Export to a file option and click on the Next button.
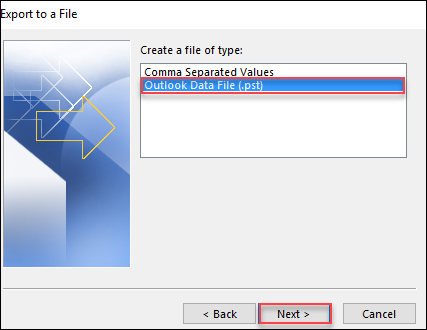
Step 5. After that select Outlook file (.pst) to export Office 365 mailbox into PST file.
Step 6. Check the option Include subfolders and click the Finish button to start the exporting process.
Limitations:
- Users should have to install Outlook Desktop Applications.
- It is not possible to back up multiple user mailboxes together. You need to repeat the above steps for each mailbox.
- It consumes a lot of time to transfer a bulk amount of mailboxes.
Professional Tool to Save Office 365 Mailbox to PST Format
Yes, manual methods are free to use, but is it worth the effort after having that many amounts of limitations? After all the safety of important mailbox data during extraction is the biggest concern for anyone.
That’s why they use a dedicated and professional tool.
In this section, we are going to see two different automated solutions to bulk export Office 365 mailbox to PST file format. Even if both tools give the same results the features make the difference between them. You can select any one method to perform this operation safely.
Solution 1. Use Software to Bulk Export Office 365 Emails in PST Format
Office 365 Emails Export is one of the most recommended choices for extracting selective files or entire mailbox items in bulk. It will allow you to export your mailbox items such as emails, contacts, calendars, and tasks in a hassle-free method. Also providing the date filter options to select downloading of data.
Step 1. Launch the software and then click Login.

Step 2. Enter your credentials and click on the Sign In button to log into your Microsoft 365 account. Once you select the user Ids/ folder(s) depending on whether you logged in as Admin or not, click the Next button.

Step 3. Here, select the Email Format as Microsoft Outlook (PST) and choose to split the PST upon conversion (if required).

Step 4. Choose from the categories option to bulk export Office 365 mailbox to PST including emails, calendars, tasks, contacts, and even archive mailboxes.

Step 5. Set any date filters corresponding to each category and browse the destination path where you want to save the data as PST.

Step 6. Click on the Start button and wait for the process the complete.
You can then find all your Office 365 mailbox items as PST file(s) in the destination location.
Solution 2: Save Office 365 Mailbox to PST File Using Professional Backup Tool
Office 365 Account Backup Tool is another alternative solution that helps you to perform this task safely. On the other hand, this tool will help you in the restoration of the backed-up mailbox back into the Microsoft 365 account without any additional requirements.
The tool offers various magnificent features that can’t be beaten by any other solution. It facilitates the Pause & Resume option which will help you to avoid hazardous situations and protect your data while backing up.
The tool also allows selective backup through various filter options. The features like cross-user restore, folder hierarchy maintenance, etc. make the utility unique from other tools.
Step-by-Step Procedure to Bulk Export Office 365 Mailbox Data to PST Files
Step 1. Launch the software after downloading it on your computer. Choose Office 365 as the source platform and choose Outlook as the destination backup platform.
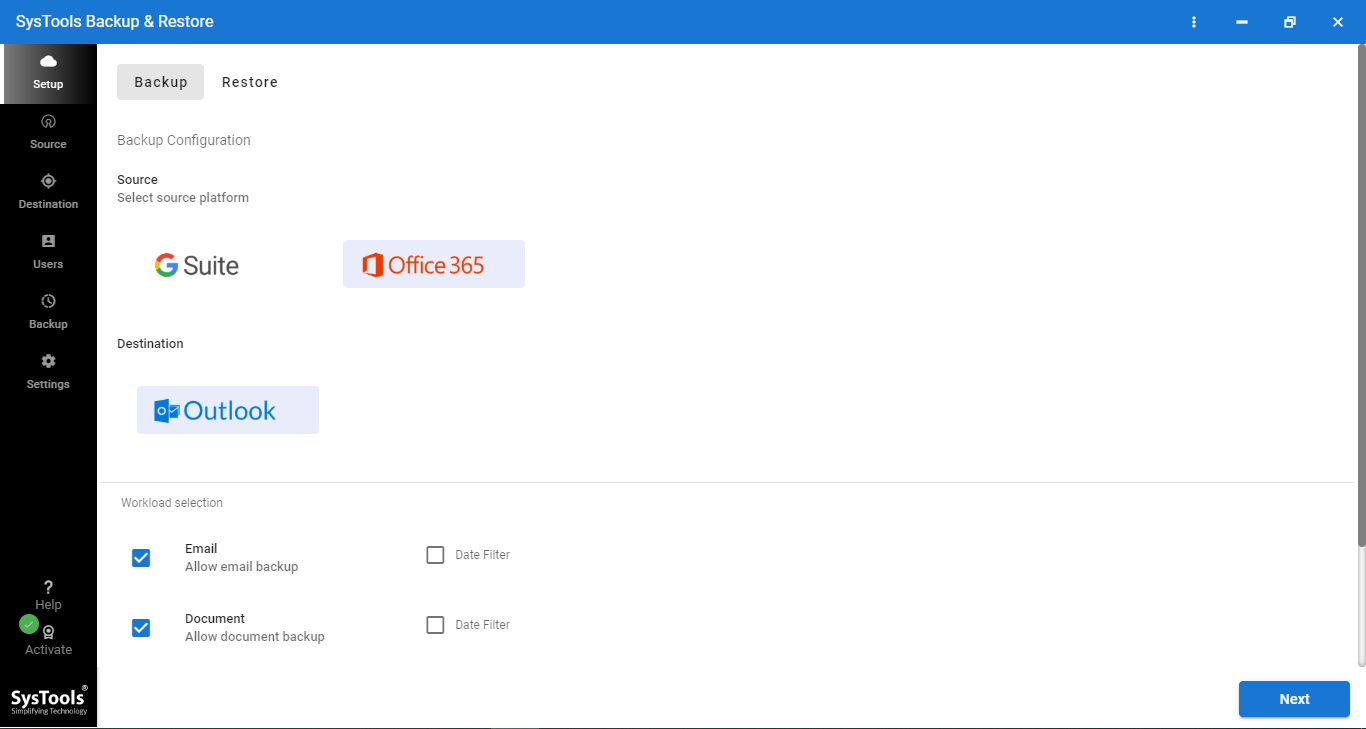
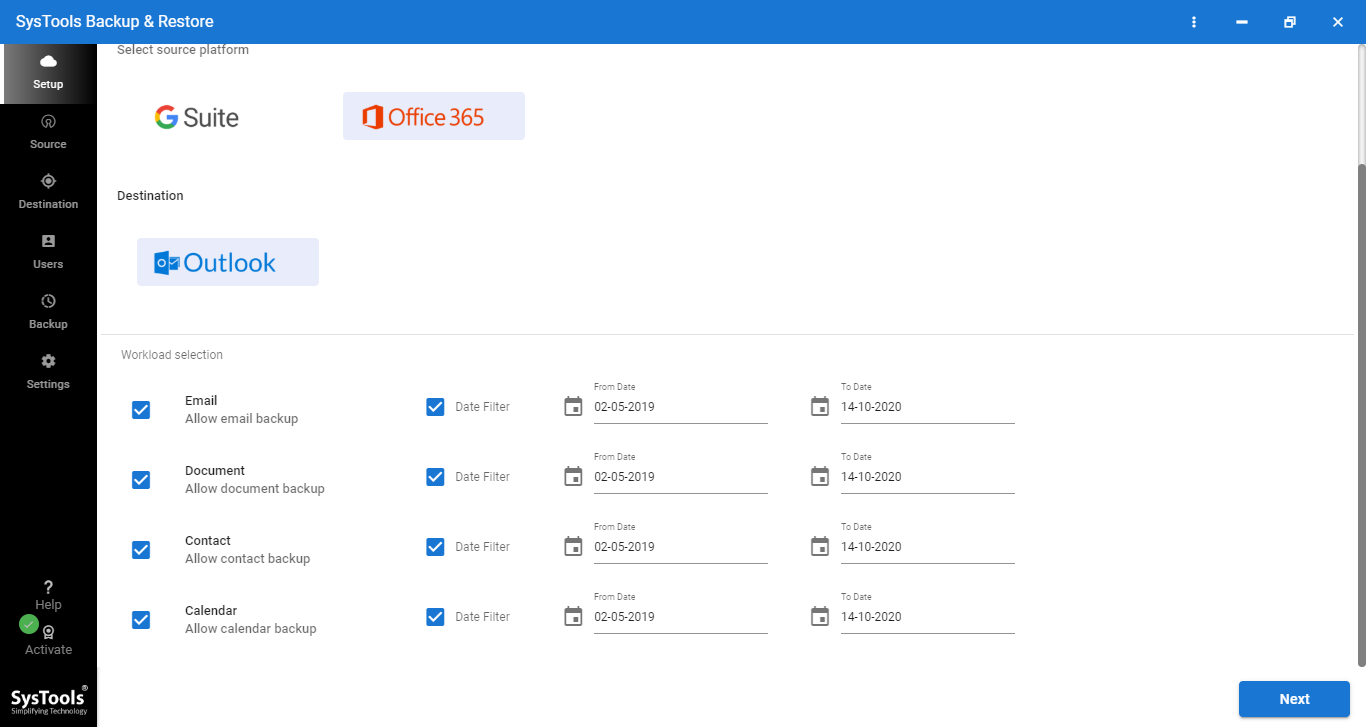
Step 2. Select preferred mailbox item categories from the given options. You can also use the smart date filter provided by this utility for specific and selective backup according to a date range.
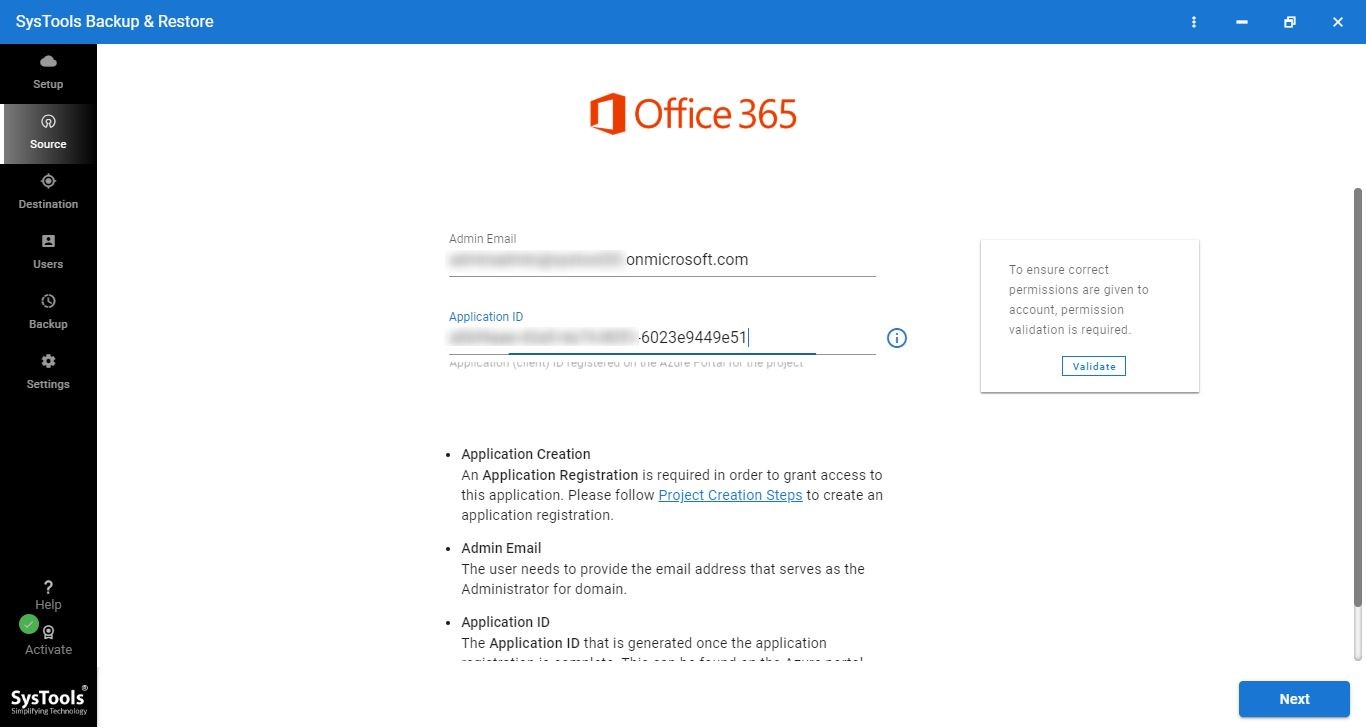
Step 3. You have to log in using the admin ID and Application ID in the software and you have to click on validate button. It will validate the required permissions.
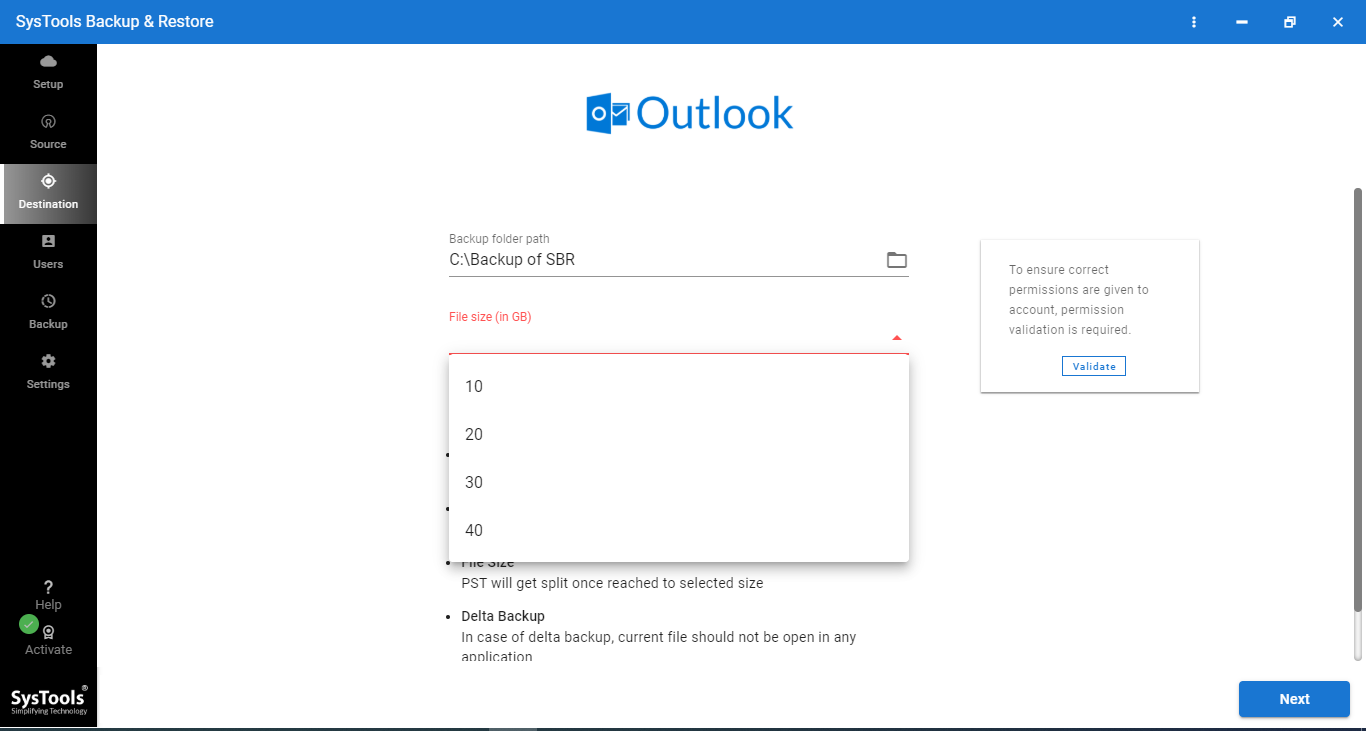
Step 4. Specify the destination path and location on your computer for storing the resultant PST file on your local storage.
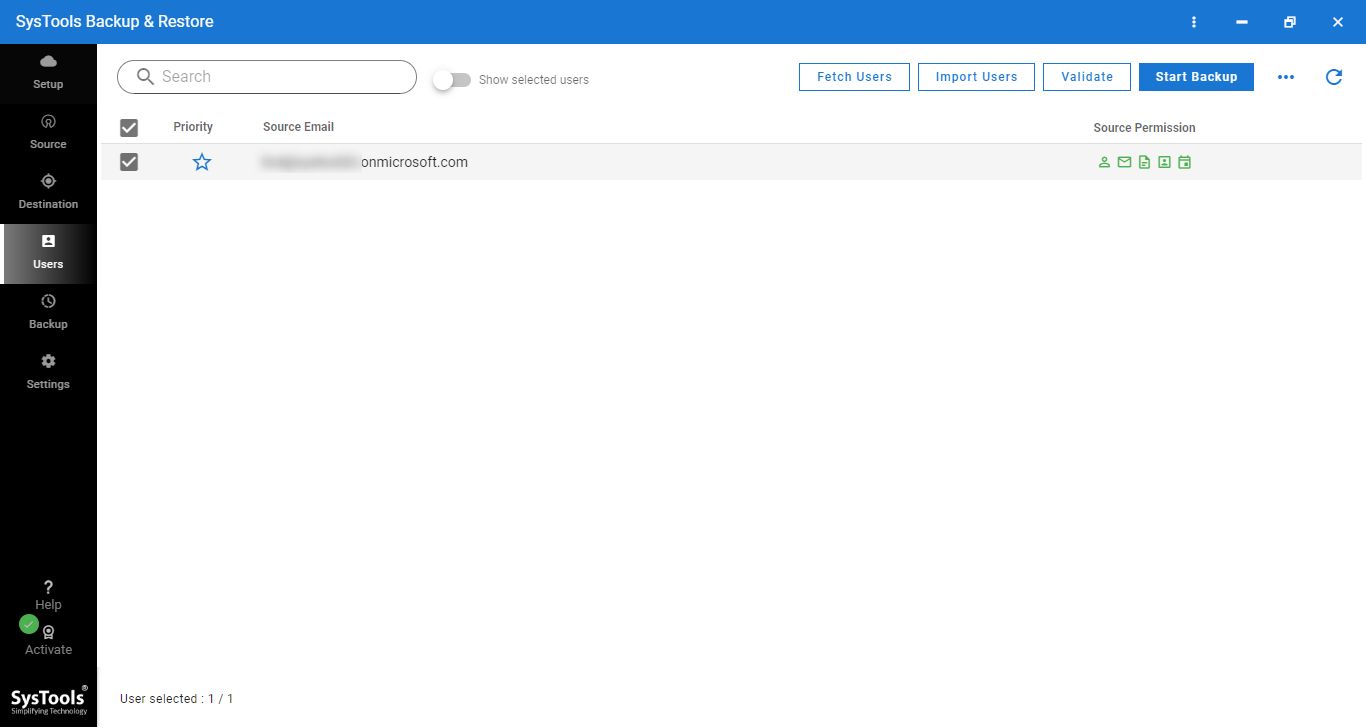
Step 5. Now, from the given list of user accounts, select the desired user’s account and click on the Start Backup button to initiate the backup process.
Also Read: How to Create Shared Mailbox in Office 365?
Wrapping Up
Users may need to save their cloud Office 365 data for the purpose of accessing them outside the cloud platform etc. The relevant manual approach to achieve it is by using the eDiscovery tool. However, nowadays with time and effort being equivalent to money, this procedure may not be feasible for most users. Hence, in this blog, we have mentioned all possible manual methods and the most efficient two alternative solutions as mentioned above. It can bulk export Office 365 mailbox to PST quickly and reliably. However, users are free to choose any of the preferred ways for the same.