How Do I Add a PST File to Outlook 365?


Hi, everyone! I was using Outlook 2016 for the past couple of years. Now, our company has decided to switch to Outlook 365 for up-gradation. I have tons of important emails and attachments in my Outlook account. And I don’t want to lose any of my email data files.
That’s why I am searching for a relevant method to add PST to Outlook 365. Can anyone help me by providing a relevant solution on how do I add a PST file to Outlook 365?
Nowadays, migration from desktop-based applications to cloud-based services is very trending.
Most of the business users prefer Outlook 365 as it provides lots of beneficial services. Outlook 365 is a web-based version of desktop Outlook with advanced features. Hence, users want to move towards Outlook 365.
But the majority of people don’t know how to attach PST in Outlook 365. Therefore, in this article, we’ll share with you both the manual and automated methods to do this job.
Let’s get started with manual solutions.
How to Add PST to Outlook 365 Manually?
Microsoft provides two techniques that allow users to attach PST file to Outlook 365 online. Let’s have a quick glance at these manual solutions.
1: Network Upload: In this method, you need to upload the PST data over the network to a temporary Azure storage location. Then, you have to use the MS Outlook 365 Import service to import the PST data to mailboxes in your Outlook 365 account. Look at the steps that are required to do so.
- Copying the SAS URL & Installing Azure AzCopy tool.
- Uploading PST file to Microsoft 365.
- Creating the PST Import mapping file.
- Creating a PST Import job in Microsoft Outlook 365.
- Filtering data and running the PST import job.
2: Drive Shipping: In this approach, you need to copy the PST files to a BitLocker-encrypted hard drive and then physically ship the drive to Microsoft. After that, Microsoft will take 7 to 10 business days to upload the PST files to a temporary Azure storage location for your organization.
1: Downloading the secure storage key and PST Import tool
2: Copying PST data to the hard drive.
3: Creating a PST Import apping file.
4: Creating a PST Import job in Microsoft 365.
5: Shipping hard drive to Microsoft.
The Downside of the Manual Approaches
1: Manual methods are time-consuming and require a significant amount of time.
2: It is quite challenging to upload the large-sized PST file.
3: Process is very complicated, it requires technical expertise.
4: Skipping of the steps may lead to file corruption or data loss.
5: Strong knowledge of PowerShell commands is required for execution.
As you can see there are lots of technical constraints that you may have to suffer from. That’s why lots of organizations and business users will prefer a third-party solution to save their time and data.
How Do I Attach PST File to Outlook 365?– An Expert Solution
The PST to Outlook 365 migration tool is an automated software that helps users to import PST files like emails, attachments, tasks, contacts, calendars, notes into Outlook 365 account. The best part of the software is that it can easily add PST data into Outlook 365 without any file size limitations.
Prominent Features of the Automated Software
⦁ Rapidly add multiple PST file to Outlook 365 mailbox in bulk.
⦁ Does not impose any file size restrictions.
⦁ Provides date range filter option for selective PST emails.
⦁ Maintains data integrity by keeping folder hierarchy.
⦁ It doesn’t require Admin credentials to attach PST file to Outlook 365.
Now, let’s know how the tool works.
Get to Know Working – 5 Simple Steps
First of all, you need to download and install the software in your system. Then, follow the below-mentioned steps to add PST file to Outlook 365.
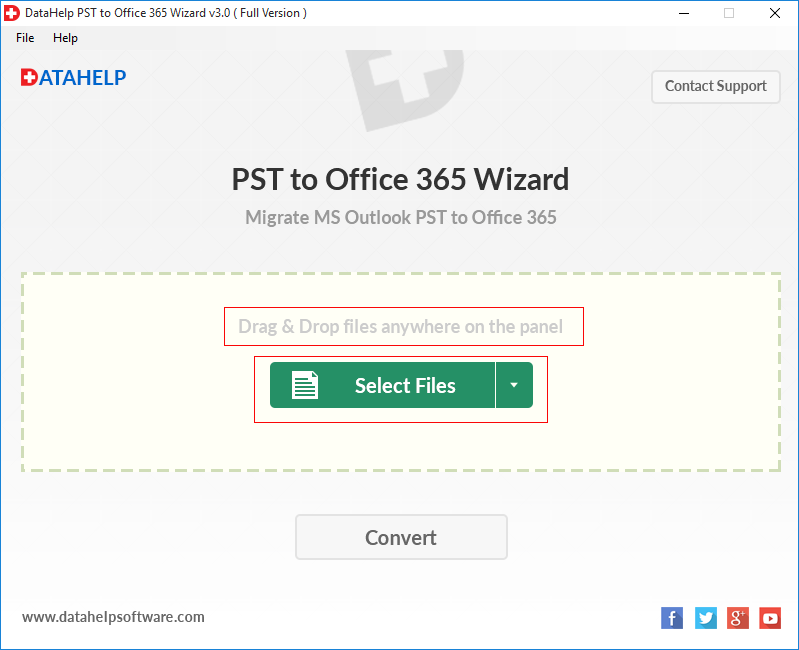
Step 1: Launch the tool. Now, insert PST files using the “Drag & Drop” and “Select Files” option available in the tool.
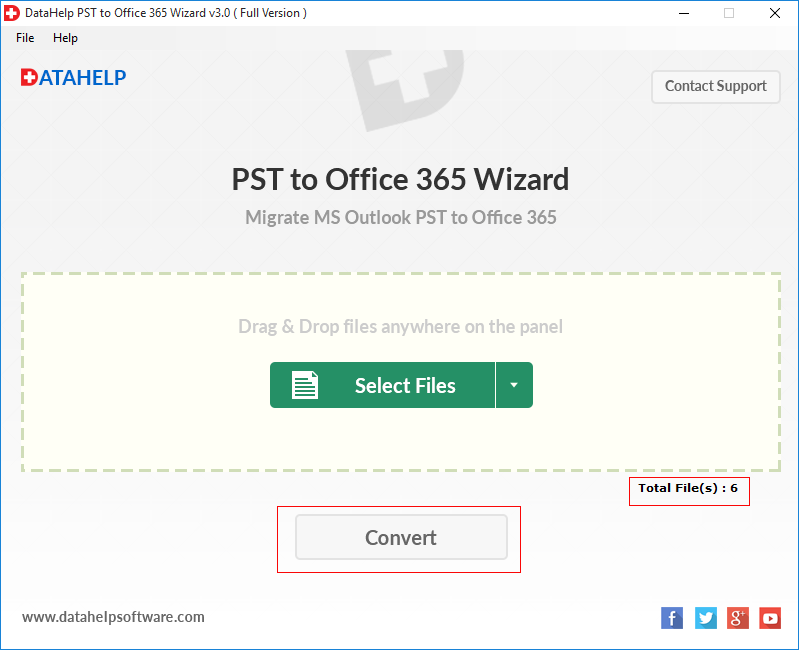
Step 2: After inserting the PST files and click on the “Convert” button.
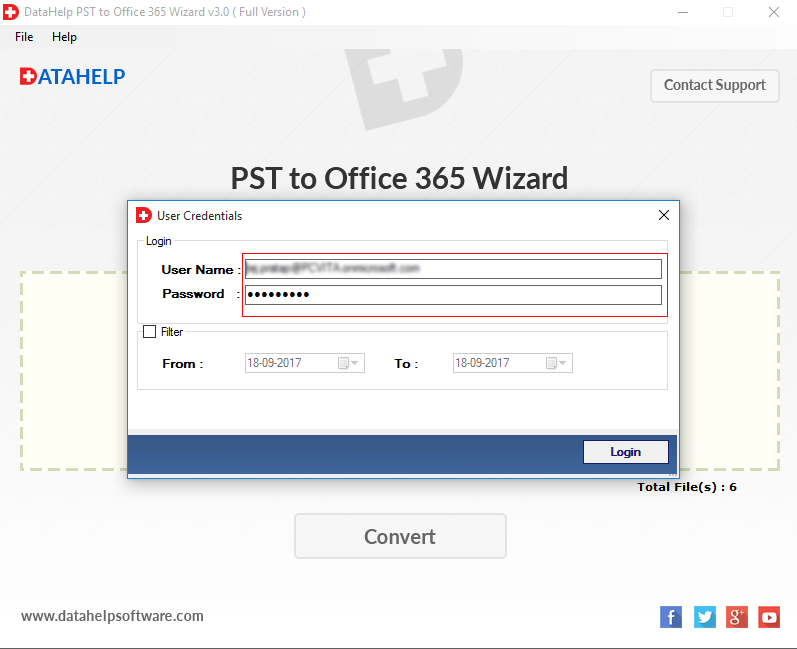
Step 3: Enter “Outlook 365 account credentials” & click on the “login” button to start the migration process.
Step 4: Now, the software successfully imported PST files into Outlook 365 mailbox.
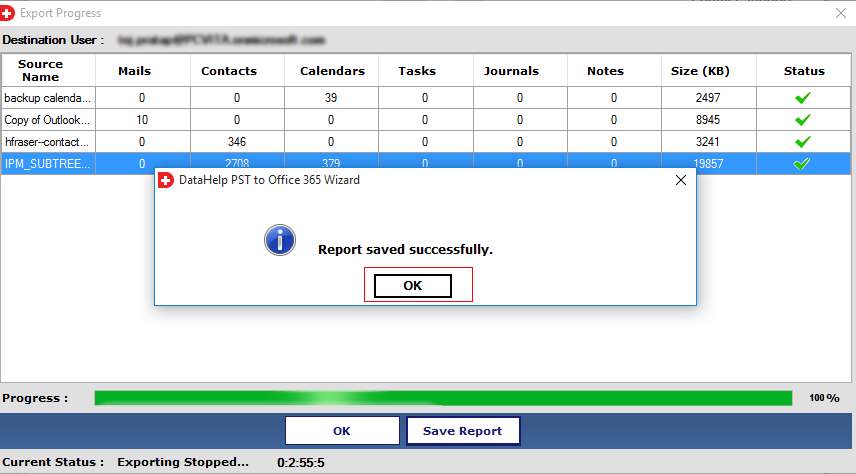
Step 5: At last, click on the “Save Report” button to save the export report.
Hence, by using the above simple steps, we have successfully attached the PST files to Outlook 365 account.
Concluding Thoughts
As we are aware that nowadays many people are switching towards cloud-based services. Therefore, in this blog, we resolved one of the frequently asked users queries i.e how do I add PST file to Outlook 365.
We have discussed manual methods to do this task. But, we found that they have certain kinds of limitations. Hence, to overcome these technical constraints, we suggested the professional tool that allows users to perform this task without any hassle.