How to Create a New Outlook PST File: A Simple Guide


Over time the inbox of Microsoft Outlook can become messy and a slow-moving pile of data. It starts to lag, search stops working and you might even run out of server space when your main mailbox gets full. Many users do not know that they can move their old emails into a separate archive to keep their main account light and fast. The most effective way to handle this situation is by learning how to create a new Outlook PST file as it allows you to clear up space in the server while keeping your data accessible on your computer.
Here we will look at the different ways to create a new Outlook data file whether you are using Outlook 2016, 2019 or 365. We will also look at how to fix the files and what to do if your data files get damaged.
Table of Contents:
Pro Tip: You can check out our expert take on how to export Gmail emails to PST with and without Outlook if you are creating a new PST file because the process is easier if you have the right strategy.
Why Should You Create a New Outlook PST File?
Let’s get to know why you should create an Outlook file before knowing how. You can move the emails into the Personal Storage Table (PST) instead of keeping every email that you have received in your active inbox. If you know how to create a new Outlook PST file then it helps you to:
- Reduce the mailbox size and keep it under the limit.
- Create a copy of your emails and save them on your hard drive.
- Keep all the emails in their own file that are related to one client.
- Improves performance as a smaller mailbox means a faster Outlook.
Keeping your files at a healthy size prevents issues like: An Object Could Not Be Found Outlook Error, which generally occurs when the data file becomes too big or disorganized for Outlook to read.
Manual Methods to Manage Your Data
Microsoft provides the built-in methods to handle your data without any extra software as they are an effective way for users who want to keep their inbox clean by using the tools that are already available in Windows and Office.
Method 1: Set Up New Outlook PST File Using the Account Settings
You might prefer to create a New Outlook PST file through the Account Settings Menu if you are an IT admin or need to manage multiple accounts as this gives you more control over the file properties. Following steps will help you to set up a New Outlook data file:
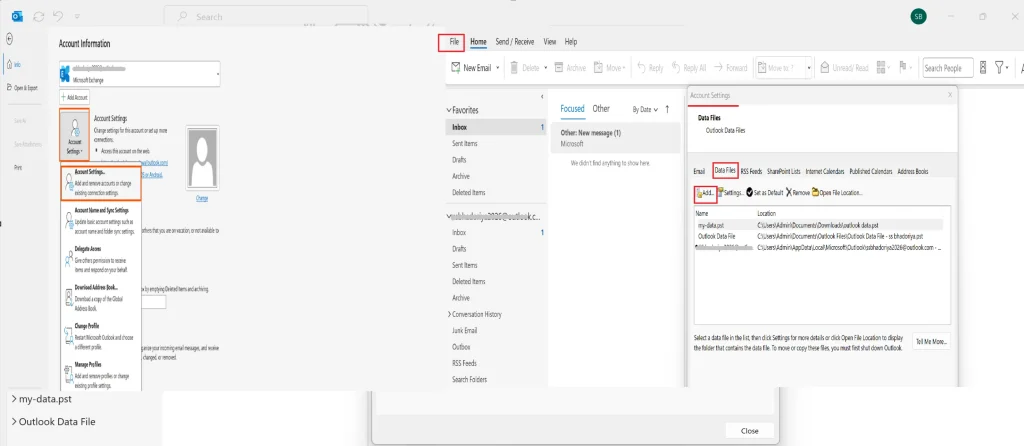
- Open Outlook and click on the File tab in the top left corner.
- Select the Account Settings button and then click on Account Settings again from the dropdown.
- Click on the Data Files Tab in the window that opens and click the Add button at the top.
- Name your file and select the saving location. Finally your new file is ready to use.
Note: If you want to Compact PST File without Opening Outlook then you can read about it here.
Method 2: Using the Control Panel
If Outlook is not opening at all you can still create a new Outlook PST file using the Windows Control Panel as this is the backdoor method that works even when the application is acting up. Use the steps mentioned below
- Type Control Panel in your Windows search bar.
- Search for the Mail icon and click on the Data Files button.
- Click on Add, name your file and then click the Ok button.
- This ensures that you can create a New Outlook data file even if the main program is stuck or crashing.
Note: Use this method carefully as it can lead to system errors if done carelessly.
What to Do if Your PST File Gets Corrupted?
The PST files are stored on your local drive so they can sometimes become corrupted or broken due to a sudden power cut, system crash or because the file got too big. You may not be able to open the file you worked so hard to create a new Outlook PST file for when such a situation happens. Manual fixes often fail to keep your folders organized and the basic tools like ScanPST fail if the file is too damaged or it is very large as they are only meant for minor errors.
This is where the DataHelp PST Repair Software is an effective solution as it is a professional tool designed to fix broken PST files and recover lost emails. It moves your data into a new and stable structure that stops Outlook from crashing in the future.
Why is This Tool Recommended?
- Capable of recovering data from damaged and corrupted PST files.
- Repair large-sized PST files easily as there is no file size limitation.
- Support to repair PST files of Outlook 2007, 2016, 2013, 2010, etc.
- Removes encryption and repairs corrupt PST files.
- Recover emails, contacts, calendars, attachments, tasks, etc.
- An advanced option to scan a PST file to repair a corrupt PST.
How to Use This Tool?
- Download this software on your computer and open it.
- This tool gives you two options: Select the file or Search the file.
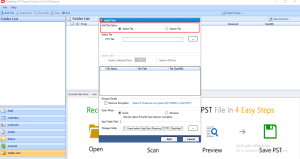
- Choose any one of these options and then click on Add file.
- Select the Advance scan mode for a deep repair of your data.
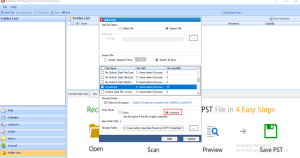
- You will see all the recovered emails on your screen.
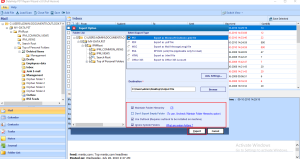
- Finally select PST as the output and click on Export.
Summary
Knowing how to create a new Outlook PST file is an important skill for anyone who uses email for work or personal life. We have learned that a PST file that helps you save space and keep your inbox organized and you can also create a new Outlook data file through the Home menu, the Account Settings or even the Windows Control Panel.
We have also seen that while it is easy to set up a new Outlook data file, these files can sometimes break. Using a professional tool is an effective way if this happens as it is designed to fix broken PST files and recover lost emails. By following these steps you can ensure that your computer stays fast and your important messages are safely archived.